What is Rug Tufting?
Rug tufting is a textile craft where you use a specialized tool called a tufting gun to push loops or cut yarn through a fabric backing, creating custom rugs, wall hangings, and decorative pieces.
This guide provides a comprehensive roadmap of the core process, from initial design concept to the final, finished piece, preparing you for a successful start in this rewarding craft.
Reading time: 12 minutes | Skill level: Complete beginner | Project time: 4-8 hours
The 10 Steps to Tufting Your First Rug
The tufting process is fundamentally sequential. Mastering the early foundational steps is non-negotiable for success, as problems in frame setup or tension will manifest as critical failures later in the process, such as yarn skipping and uneven pile height.
A Quick Accelerator for Visual Learners:
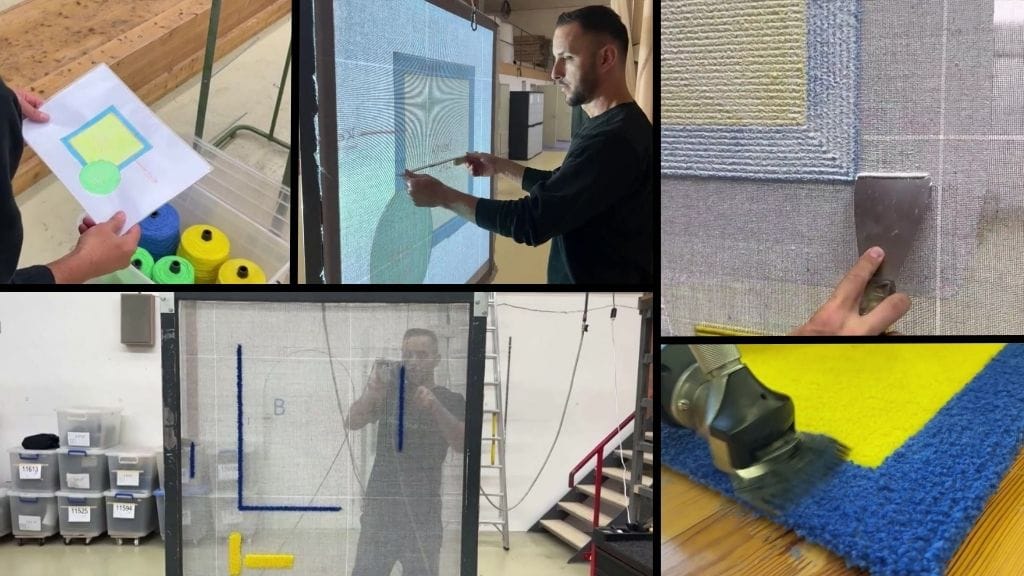
Our written beginner’s guide to rug tufting breaks down every step, but for instant visual mastery, we recommend the Tufting Mastery Video Tufting Tutorials by Kramis of Switzerland.

KRAMIS, a luxury rug manufacturer for brands like Rolex and Balenciaga, has condensed their 40+ years of expertise into a 10-part video course that shows you exactly how to create a rug from start to finish. It’s the perfect visual complement to this guide.
Step 1: Choose and Plan Your Design
The journey begins with inspiration. As a beginner, selecting a simple geometric or abstract design is highly recommended. Simple patterns allow you to focus on mastering the tufting gun and developing a consistent pace without the complexity of intricate lines and color changes.
Step 2: Building the Foundation: The Frame and Fabric Preparation
The quality of your finished rug is determined before the tufting gun is even turned on. The frame and the primary backing fabric are the non-negotiable foundations for a professional piece.
The Frame
Your frame acts as the bedrock of the entire operation. It must be sturdy, completely rigid, and capable of maintaining an absolute square. Any movement or “wobble” in the frame will ruin the consistency of the tufted pile.
For detailed frame construction plans, material analysis, and sizing guidance: Please refer to the dedicated resource: The Tufting Frame Guide.
The Fabric and Tension
The frame must be fitted with a mechanism to securely hold the primary backing fabric. The fabric, typically a durable polyester-cotton blend, must be stretched across this hardware to maximum tautness.
The cloth should be stretched with the tension of a drumhead, a state often referred to as “Drum-Tight”. Achieving this level of tension is the most important technique for preventing common failures like skipped stitches and yarn pull-out.
For the step-by-step stretching methodology, troubleshooting common tension issues, and safety tips for handling the gripping hardware: Please refer to the dedicated resource: Stretching Fabric on a Tufting Frame.
Step 3: Transfer Your Design
Once the canvas is perfectly taut, the design must be transferred accurately to the backing. This can be achieved by lightly drawing the design directly onto the cloth, projecting the image onto the frame, or using a stencil. Accurate line work at this stage ensures your final product maintains its intended shape and dimension. For further details, please refer to our guide on: Design Transfer for Rug Tufting.
Step 4: Set Up Your Yarn System
Consistent yarn feeding is essential for consistent tufting. Ensure your yarn is set up above the tufting frame so it feeds smoothly and consistently into the tufting gun. Using cones of yarn often works better than balls, as cones are less likely to create resistance in the feeding line.
For a complete comparison of fiber types, see our guide on: Best Yarn for Tufting Gun.and purchasing advice, see our guide on: The Best Yarn for Tufting Gun.
If you plan to use premium materials, consult the technical guide on: Wool Yarn for Rug Tufting.
Step 5: Start Tufting
The electric tufting gun allows for great speed, but control and technique are paramount.
- Outlines First: Always begin by outlining your entire design.
- Perpendicularity: Place the needle of your tufting gun perpendicular (at a 90-degree angle) to the cloth.
- Consistency: Press the trigger, keep it pressed, and move the gun along your design lines at a steady, consistent pace. Applying consistent pressure on the tufting gun is critical for achieving even pile height.
- Critical Motion Technique: The tufting gun operates based on a One-Way Motion Principle. To tuft along curves or change direction, you must always rotate the entire machine, not just your wrist, to prevent the needle from tearing the fabric.
- Timing: Never stay in one spot too long, as this can tear the fabric. For the complete procedural breakdown of motion, turning techniques, and essential safety warnings, see our full guide: Tufting Machine Basics: How to Move and Turn
Step 6: Fill in Your Design
Once the outlines are complete, fill in each section by working in rows or columns, ensuring an even, dense application of yarn. Make sure the pressure applied to the gun is consistent to avoid uneven pile height.
Step 7: Trim and Shape
As the rug is filled in, or immediately afterward, you can use clippers or scissors to trim the tufted loops, leveling the pile and refining the edges to give your rug a professional finish.
Step 8: Apply Adhesive
To permanently secure the yarn and prevent it from pulling out, a specialized carpet adhesive must be applied thoroughly and evenly to the back of the rug.
See exactly how to apply this system in our guide: Best Glue for Rug Tufting Beginners.
Pro Tip: The Glue Trio for Durability For professional results, don’t rely on just one adhesive. Industry veterans use a “trio”, 3M 77 Spray to set the yarn, Roberts 3000 for the main bond, and Hot Glue for the waterfall edges.
Step 9: Add Backing
Once the adhesive is fully cured, a secondary backing material is typically added. This backing provides extra protection, stability, and a clean, professional finish to the rug’s reverse side.
Step 10: Final Trimming
The final step is often a meticulous trim, using shears or clippers to perfectly level the pile and carve the final details, bringing the piece to its finished, sculpted form.
Maintenance Note: Trimming creates an incredible amount of micro-debris. Do not use a standard household vacuum, as the fine yarn fluff will clog the motor in minutes. We highly recommend using a Shop Vac with a high-efficiency filter to keep your studio air clean and your equipment safe.
Next Steps
Rug tufting is an expressive and creative outlet. While the process may seem daunting at first, gaining confidence in handling the tools involved becomes an enjoyable hobby. Start with small test pieces to practice your skills before committing to a larger project.
A Note on Craftsmanship: Tufting vs. Knotting
It is important to understand the lineage of the craft you are learning. While machine tufting allows you to create durable rugs in hours, it is not the same as traditional hand-knotted rugs.
- Hand-Knotted Rugs (The Heirloom): These use individual knots tied by hand on a loom, a process that can take months or even years. They are held together by the knot structure itself, making them capable of lasting for generations (50-100+ years).
- Hand-Tufted Rugs (The Modern Art): Your rug is held together by the quality of the adhesive and the secondary backing, a process that takes hours. While a well-made, hand-tufted wool rug using a premium adhesive can last 5 to 15 years in a residential setting, its lifespan is dependent on the durability of the glue, not the knot structure.
Your success in tufting is defined by using professional-grade techniques, materials, and adhesives to maximize that durability.
The Beginner’s Rug Tufting Investment
Beginner’s Guide to Rug Tufting Tools
The right tools make the difference between frustration and success. Here’s everything you need to start tufting, with specific recommendations based on extensive testing and community feedback.
For a complete, up-to-date list of all necessary tools, materials, suppliers, and purchase options (including kits, guns, frames, and yarn), please consult our definitive procurement guide: The Best Tufting Tools of 2025
Need specific comparison data or feature analysis?
- Tufting Guns: For detailed machine models, features, and durability comparisons, please see Top-of-the-Line Tufting Machines and Why I Tell Every Beginner to SKIP Amazon Tufting Guns (After Testing 2 Different Starter Kits).
- Yarn Selection: For crucial insight into material differences and durability for floor rugs, see How to Choose the Best Yarn for Rug Tufting.
- Tufting Frame: For structural guidelines and commercial frame comparisons, see The Tufting Frame Guide.
Part II. Tool Mastery: Your Gun, Your Routine, Your Safety
The tufting gun is a precision power tool. Its efficiency, your speed, and your safety depend on understanding the mechanics and adhering to a simple maintenance routine. Refer to our dedicate guide: Tufting Gun Maintenance and Troubleshooting: A Complete Guide to Machine Care
2.1 Tool Selection
If you are unsure which machine to purchase, a basic cut pile, a versatile 2-in-1, or a heavy-duty industrial model, please consult our detailed buying guides for comparative features and durability.
Further reading: Why I Tell Every Beginner to SKIP Amazon Tufting Guns (After Testing 2 Different Starter Kits)
2.2 Ergonomics and Mandatory Protection
Tufting is physical work. Protect your body from long-term strain and hearing damage.
- Grip and Flow: Hold the gun with a firm but relaxed grip. Your movement should come from your shoulder and elbow, not your wrist, to prevent repetitive strain injuries.
- Wear Your Gear (Mandatory!):
- Hearing Protection: Tufting guns are loud electric tools. Always wear earplugs or ear defenders to prevent permanent hearing damage.
- Respiratory Protection: Tufting creates a lot of fine fiber dust. Wear a mask (or operate an air purifier) to mitigate the risk of inhaling these fibers, which can cause respiratory issues over time.
Part III. The Fiber Foundation: Choosing Yarn for Durability and Art
The yarn you choose is the single greatest determinant of your rug’s finished quality and its life span. Using the wrong fiber for a floor rug will result in crushing, shedding, and premature wear, no matter how good your tufting technique is.
3.1 Durability First: Yarn for Floor Rugs
When you are creating a piece that will see foot traffic, the hallmark of a professional rug, the fiber must be resilient and able to withstand compression.
- Wool is recommended for floor rugs.
- The Accessible Alternative: Acrylic
Crucial Insight: The difference between fibers is fundamental for longevity. Read our complete guide: How to Choose the Best Yarn for Rug Tufting
3.2 Creative Freedom: Yarn for Wall Art and Novelty
When the piece is purely decorative, like a wall hanging or fiber art, you are free to choose based on texture and visual effect, not durability.
- Novelty Yarns: Explore thicker, chunkier yarns, or even unconventional materials like recycled fabric strips. Since the piece won’t be stepped on, you can choose materials that offer high visual impact.
- Cotton & Blends: These fibers offer a matte finish and are excellent for creating pieces that require crisp lines and specific aesthetics, though they are wholly unsuitable for floor use as they offer zero crush resistance.
Part IV. The Execution: Technique, Consistency, and Flow
This is where you move from setup to skill. High-quality tufting is about consistent speed, pressure, and angle.
💡 Pro Practice Before Perfection: The Warm-up
Before you commit to your final project, you must perfect basic tufting techniques. Take time to practice on a scrap section of your cloth. Mastering the gun’s feel is non-negotiable for a consistent final rug. Your warm-up should include:
- Perfecting Straight Lines (maintain the 90-degree angle and 1 inch/second pace).
- Outlines with Angles (practicing stopping and pivoting, which requires rotating the entire machine as detailed in our guide on Tufting Machine Basics: How to Move and Turn).
- Curvy Lines and Circles (using shorter bursts and smooth arm movement).
- Filling in a Basic Shape (maintaining consistent spacing and density).
Only after your practice feels smooth, and your lines are even, should you start on your traced design!
4.1 Establishing Proper Tufting Flow
Your goal is to be a machine yourself, smooth and steady.
")
- The 90-Degree Rule: Always hold the gun strictly perpendicular (90-degrees) to the primary cloth. If you tilt the gun, you create uneven loop lengths, leading to a thin, messy rug.
- The 1-Inch-Per-Second Pace: Maintain a steady, controlled speed, about 1 inch per second is a good starting rhythm. Move continuously and make sure your rows slightly overlap to ensure there are no gaps when you flip the rug over.
- Directionality Matters: For large areas, always fill in a consistent direction (e.g., all vertical rows). This consistency prevents messy textures due to fiber reflection.
To ensure your machine moves smoothly in your desired direction, whether up, down, or sideways, you must master the technique of machine rotation. We break down the One-Way Motion Principle and Rotation Warning here.
Part V. Finishing Strong: Density, Detail, and Durability
The final steps are what separate a homemade craft from a professional-grade rug. Durability is a function of the density of your tufts.
5.1 The Formula for Plushness: Density vs. Pile Height
How long your rug lasts depends on how tightly packed your yarn is.
| Application/Area | Recommended Pile Height | Density Recommendation | The Why |
| High-Traffic (Entryways) | Short to Medium (1/4″ to 1/2″) | High Density (Tightly packed) | Shorter fibers naturally resist crushing and matting best, making the rug last longer. |
| Living/Bedrooms | Medium (1/2″ to 3/4″) | Medium to High Density | Balances softness and comfort with the structural integrity needed for daily use. |
| Decorative Art | High (3/4″ to 1″) | Highest Possible Density | Long fibers crush easily, so they must be extremely dense to maintain their look. |
5.2 Sculpting and Carving for 3D Detail
Once the tufting is done, it’s time to become a sculptor.
- Initial Trimming: Use electric shears or clippers to first level the yarn height across the entire rug face.
- V-Grooves (The Pro Look): The secret to a 3D-looking design is carving. Use your shears to cut a V-groove right into the rug between distinct color boundaries. This creates definition and separation, making your design pop with a professional level of contrast.
VI. Workshop Cleanliness: The Health of Your Craft
- Do NOT Sweep: Sweeping fiber dust simply launches the fine, harmful particles back into the air. Always use a vacuum to clean up scraps and dust, or wet-clean your floors.
- Pro Upgrade: Consider a cyclone dust separator attached to your shop vacuum. It captures the heavy debris, preventing clogs and keeping your studio air quality at its best.
Beginner’s Guide to Rug Tufting FAQ’s
Is rug tufting easy to learn for complete beginners?
How much does it cost to start tufting seriously?
What’s the difference between budget and premium tufting guns?
Budget machines are often built with lower-grade components prone to mechanical failure, while premium guns offer superior durability and precision for professional use. For a technical breakdown of performance and our top reliability rankings, see our guide on the Best Tufting Gun Starter Kits.
Can I use regular yarn for tufting?
For complete yarn guidance, see our Wool Yarn for Rug Tufting Guide.
How long does it take to finish a rug?
Can I sell rugs I make as a beginner?
How do I maintain my tufting gun?
Do I need a lot of space for tufting?
What’s the best first project for a complete beginner?
Is tufting loud? Will it disturb neighbors?
Can children learn tufting?
Next Steps and Advanced Techniques
Once you’ve mastered the basics, exciting advanced possibilities await. Your investment in quality tools provides the foundation for sophisticated techniques and potential business opportunities.
Intermediate Skill Development
With solid fundamentals, explore more complex designs:
- Advanced Pattern Techniques: Gradient color work, texture mixing (cut and loop pile), realistic imagery, and three-dimensional effects (varying pile heights for sculptural appearance).
- Size Progression Strategy: Gradually increase project complexity from 18″ x 24″ to 36″ x 48″ statement pieces.
Professional Development Opportunities
Many tufters successfully develop commission businesses:
- Custom Commission Work: Start setting rates for custom designs.
- Building a Commission Portfolio: Document all projects with high-quality photos to build a signature style and social media presence.
- Teaching and Workshop Opportunities: Share your skills through education at local craft stores or community centers.
Advanced Material Exploration
Beyond basic wool, explore specialty materials:
- Yarn Innovation: Silk blends, Alpaca wool, recycled fibers, or metallic threads for luxury feel and unique aesthetic appeal.
- Professional Finishing: Explore museum-quality backing, washable treatments, and custom edge finishing for brand differentiation.
Final Challenge: Stop Crafting, Start Mastering
You’ve read the beginner’s guide to rug tufting blueprint. You understand that success hinges on stability, consistency, and professional finishing, skills that are notoriously difficult to master from static text and photos alone.
You can learn through costly trial-and-error, or you can leverage 40 years of luxury manufacturing expertise right now.
The Tufting Mastery Class by Kramis of Switzerland is the fast track for beginners and intermediate crafters who want to visually learn from professional rug crafters, and achieve a durable, high-quality result on their very first try.
Don’t just make a rug. Master the Craft.
I Want Professional Quality & Durability. Start the Tufting Mastery Class Now!