Rug tufting is a rewarding craft, but every artist hits inevitable snags, yarn falling out, uneven height, or worse, tearing the fabric. These moments of frustration are almost always due to one of a handful of technical errors.
This guide is your Diagnostic Hub. It identifies the 10 most common beginner rug tufting mistakes, explains the root cause, and provides a direct link to the specialized guide that contains the step-by-step solution.
Part I: Foundational Beginner Rug Tufting Mistakes (Frame and Fabric Setup)
The most damaging mistakes happen before the tufting gun is even turned on. These issues relate to the structural integrity of your working surface.
Mistake 1: Not Stretching the Fabric Tight Enough
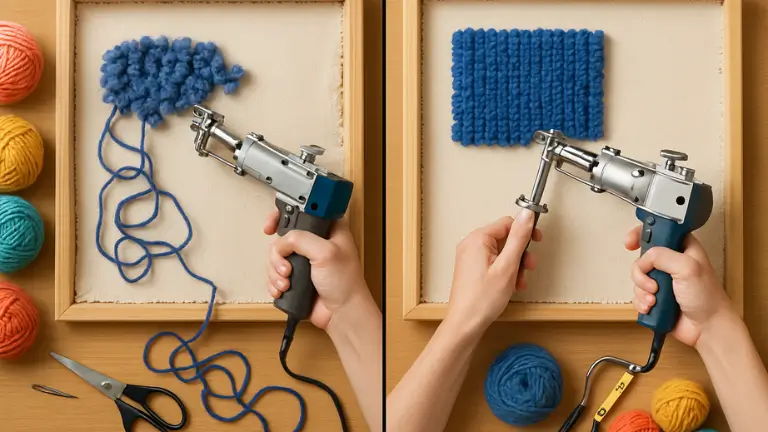
This is the number one cause of frustration and failure for beginners. If the fabric is loose, the gun’s action is inconsistent.
- The Mistake: Tufting on slack fabric that sags or moves easily when pressed.
- Root Cause: Low tension allows the fabric to “bounce,” which prevents the needle from forming a consistent loop or cut, leading directly to skipped stitches and uneven yarn density.
- The Diagnostic Fix: The canvas must be taut enough to sound like a drum when thumped with your finger.
✅ Solution: For the step-by-step Center-Out Method and guidance on achieving true “drum-tight” tension, see our authoritative guide:
Stretching Fabric on a Tufting Frame
Mistake 2: Using the Wrong Backing Fabric
The primary fabric is your defense against tearing and shifting.
- The Mistake: Using cheap, thin, or unsuitable fabrics like certain low-quality burlap or stretchy cotton weaves.
- Root Cause: These materials lack the tensile strength required to withstand both the intense initial stretching and the high-speed penetration of the tufting needle, leading to fabric tearing.
- The Diagnostic Fix: The fabric must be tufting-specific (e.g., Monk’s Cloth or Primary Tufting Cloth) to ensure it holds the yarn tightly without ripping.
✅ Solution: To understand the critical differences between materials and make the right purchase decision, consult our material science guide:
Primary Tufting Cloth vs. Monk’s Cloth
Mistake 3: Poor Frame Stability and Tearing
Structural failure of the frame itself will ruin your rug.
- The Mistake: Using a wobbly frame or a cheap metal frame that bends inward under pressure.
- Root Cause: Any movement (wobble) in the frame or its support system causes lines to become crooked and pile height to fluctuate. Low-quality metal frames often cannot achieve the necessary tension regardless of the tack strips used.
- The Diagnostic Fix: The frame must be sturdy and rigid and must maintain an absolute square, even when under extreme tension.4
✅ Solution: For construction blueprints, lumber dimension rules to prevent bowing, and instructions on how to anchor your frame with clamps, see:
The Complete DIY Tufting Frame Blueprint
Part II: Execution Mistakes (Gun and Technique)
These mistakes happen while you are actively tufting, usually related to operator error or gun maintenance.
Mistake 4: Improper Tufting Gun Technique (Uneven Pile)
Inconsistent technique is the leading cause of a patchy, messy rug surface.
- The Mistake: Holding the tufting gun at odd angles (not perpendicular) or applying inconsistent pressure.
- Root Cause: The tufting gun works correctly only when the needle is held strictly 90 degrees (perpendicular) to the cloth. Tilting the gun or rushing the process creates uneven loop lengths, leading to inconsistent pile height.
- The Diagnostic Fix: Always focus on steady, continuous movement, allowing the gun to “walk” the fabric at its set speed.
✅ Solution: To master the proper 90-degree rule, consistent pressure, and speed, the key to flawless execution, review the steps in our main roadmap:
The Beginner’s Guide to Rug Tufting
Pro Tip: Stop Guessing, Start Mimicking It is incredibly difficult to learn proper gun angle just by reading text. If you are a visual learner struggling to keep your lines straight, you might benefit from watching a master at work.
The Tufting Mastery Class by Kramis is a comprehensive video course from a Swiss rug manufacturer with 40+ years of experience.
He demonstrates the exact hand movements and body posture needed for perfect lines, helping you skip months of trial and error.
Mistake 5: Yarn Falling Out or Skipping Stitches
This indicates a failure in the yarn path or machine function.
- The Mistake: Yarn loops are not staying in the fabric, creating gaps, or the tufting machine frequently jams.
- Root Cause: Yarn feed resistance (the yarn is snagging on something), or internal yarn slack due to a loose tension plate in the gun, which leads to weak loop formation.
- The Diagnostic Fix: You must check the external yarn path (cones and guides) and the internal mechanical settings (tension plate adjustment) of the gun.
✅ Solution: For the complete guide on cleaning, oiling, adjusting the tension plate, and diagnosing yarn path issues, see: Tufting Gun Maintenance and Troubleshooting.
Mistake 6: Fabric Tearing (Hole Punching)
The most serious mistake, which can ruin a whole project.
- The Mistake: The tufting gun creates a hole or rips the fabric, often near the edges.
- Root Cause: This is caused by using a loose fabric that is allowed to “bounce” into the path of the reciprocating scissors, which snips the fabric, not just the yarn. It can also be caused by forcing the gun against resistance.
- The Diagnostic Fix: Always check that the fabric is extremely tight and never stay in one spot too long, as this concentrates stress on a single point.
✅ Solution: Review the required tension levels and advanced stretching methods that eliminate fabric bounce:
Stretching Fabric on a Tufting Frame
Part III: Quality Control and Finishing Mistakes
These errors diminish the professional appearance and durability of the finished rug.
Mistake 7: Incorrect Design Transfer
The design on the finished side is backward (reversed).
- The Mistake: Text or asymmetric designs appear reversed when the finished rug is flipped over.
- Root Cause: The artist forgot to mirror (flip horizontally) the design before tracing it onto the canvas, as tufting is done from the back side.
✅ Solution: Review the critical rule of mirroring and the step-by-step process for accurate placement:
Design Transfer for Rug Tufting
Mistake 8: Inadequate Glue Application
The most common reason for a tufted rug failing and falling apart.
- The Mistake: Applying too little adhesive, using the wrong type of glue, or not allowing enough time for curing.
- Root Cause: The glue (typically latex or specialized carpet adhesive) is the sole structural component holding the thousands of yarn strands in place. If the glue is insufficient or not cured, the yarn will pull out when the rug is used.8
✅ Solution: For material choice, application techniques, and cure times, see our guide on the Finishing and Backing Process.
Mistake 9: Skipping Design Planning
Failing to plan for yarn quantity and color sequencing.
- The Mistake: Running out of a specific color mid-project, or realizing the design is too dense for the frame size.
- Root Cause: Skipping detailed planning. Yarn is the biggest expense, and calculating the required quantity (e.g., 8 ounces per square foot) is essential for budget and efficiency.
✅ Solution: Start by calculating your needs with our pricing and material breakdown:
Mistake 10: Forgetting Safety Gear
Tufting is a loud, physical process that creates fine dust.
- The Mistake: Failing to wear earplugs and a respirator.
- Root Cause: The tufting gun is a loud power tool, and the constant friction of the yarn creates fine fiber dust. Both pose long-term health risks without proper protection.
✅ Solution: Always wear appropriate protection. For a complete review of safety gear and techniques, see:
The Beginner’s Guide to Rug Tufting
Part IV: The “Sudden Failure” Phenomenon
A common frustration reported by tufters on forums like Reddit is when a previously smooth process suddenly stops working, leading to catastrophic fabric failure on a new project.

Mistake 11: Ignoring Sudden Changes in Performance
This isn’t a single mistake but a failure to recognize a mechanical change. A user on r/Tufting described a situation where everything was going smoothly, but then on a new piece, the fabric began tearing immediately, ruining the project.
- The Mistake: Continuing to tuft when the gun’s performance suddenly changes, assuming it’s a user error or a fabric issue.
- Root Cause: If your setup (fabric tension, yarn type, pressure) hasn’t changed, a sudden onset of tearing or cutting issues often points to a mechanical change. Common culprits include:
- Dull or Misaligned Scissors: The scissors inside the gun can dull over time or get knocked out of alignment, causing them to snag and tear the fabric instead of cleanly cutting the yarn.
- Loose Components: Vibrations can loosen screws, particularly those holding the foot or the scissor mechanism, leading to erratic movement.
- The Diagnostic Fix: Stop immediately. Do not force the gun. Perform a full maintenance check.
- ✅ Solution: Before starting a new project, especially after a period of use, follow the cleaning, oiling, and inspection steps in our Tufting Gun Maintenance and Troubleshooting guide. Sharpen or replace the scissors if necessary.
Part V: Troubleshooting Hub FAQ
You should re-tighten the fabric whenever it starts feeling loose, especially halfway through working on a large area. Stop, pull the fabric onto the tack strips evenly, and check for the drum-sound again.
The machine is usually indicating a power flow or internal error. First, check that the power cord is securely plugged in, then check the threading path for any yarn tangles or friction points that may be impeding the mechanism.
Yes, permanent alcohol-based markers are the standard for tracing lines on tufting cloth because they adhere well and dry quickly. Avoid water-soluble markers as they can bleed into the yarn and stain the final piece.
This is a mechanical issue. Check the scissors or cutting mechanism for lint or dirt build-up. If the gun is clean, the tension or cutting depth settings may need adjustment (usually a very small tweak to the internal settings).
Part V: Conclusion: The Structural Success Formula
The most frustrating beginner mistakes, skipped stitches, yarn falling out, and fabric tearing, all share a common structural failure point: a lack of rigidity in your setup.
You have successfully diagnosed the problems. Now, the key to transforming those “oops” moments into “aha” moments is strict adherence to the foundational principles:
- Maintain Drum-Tight Tension: Ensure your fabric is stretched to maximum tautness before and during your project, eliminating fabric bounce and preventing the gun’s scissors from accidentally snipping the cloth.
- Use the Right Tool: Never force the tufting gun; allow it to walk the canvas at its set speed. If you have mechanical issues or yarn slack, delegate the fix to a maintenance guide.
By recognizing that tufting success is a formula built on Preparation + Rigidity + Technique, you move beyond beginner struggles.
For a complete, sequential roadmap of the entire tufting journey, from choosing your design to the final trim, see our comprehensive Beginner’s Guide to Rug Tufting.